
Vegan Wonder Wheels
Oh yes the ultimate treat from our youth, a good auld wagon wheel! It was really about time I tried to recreate this! I did however make paleo ones before… But the vegan option just seemed a little more challenging taking the marshmallow into consideration! I read that chickpea brine, can be fluffed up just like egg whites, so if you can forget the chickpea brine part when eating these little wonder wheels this is a recipe for you! If the biscuit recipe seems like too many ingredients, you can always check out my previous shortbread biscuit recipes and swap it over! This does contain a lot of ingredients and a recipe for the weekend but its totally worth it! I would recommend making the mallow and jam the night before so that it is prepped! Also once each part is made , Unless you are planning to eat them immediately I would assemble them as you need to ensure max amount of each jammy goodness and marshmallow, the weight of the biscuit on top can shove out some filling over night and we don’t want that!
Serves
Cooks in Minutes
Ingredients
Biscuit Base
- 200g ground almond
- 25g Tapioca Flour
- 1/2 tbsp baking powder
- 40g coconut Flour
- 85g coconut oil
- 2 tbsp maple/or raw honey
- 2 tbsp cashew butter
Jam
- 60g fresh raspberries
- 1 tsp stevia or maple
- 3/4 tbsp chia seeds
Mallow
- I – 400g tin chickpeas
- 3 tbsp powdered stevia OR maple
- tbsp arrowroot/guar gum or xanthum gum – all available in health for store.
- 100ml water
- 1 tbsp agar agar or carrageen moss – these are great alternatives to gelatine as a setting agent
Raw chocolate
- 140g raw cocoa butter
- 4-5 tbsp maple syrup
- 45g raw cocoa powder
- tsp vanilla extract
or
200g Vegan/carob chocolate
Method
- Preheat oven to 180°C- Very important to do so in advance.
- For the biscuit base, add the ground almond, coconut flour, tapioca and baking powder into a medium sized mixing bowl.
- In a small separate bowl, melt the coconut oil, maple/or honey (not vegan but works also) and cashew butter together.
- Combine the two using a spoon or your hands until a wet dough forms, it should stick together easily.
- Grab sections and roll into a ball shape, they should not fall apart or be dry.
- Press down the ball on a non stick baking tray or a lined tray -aprox (.75 -1cm) in height and using a cookie cutter continue this process to make 14 biscuits.
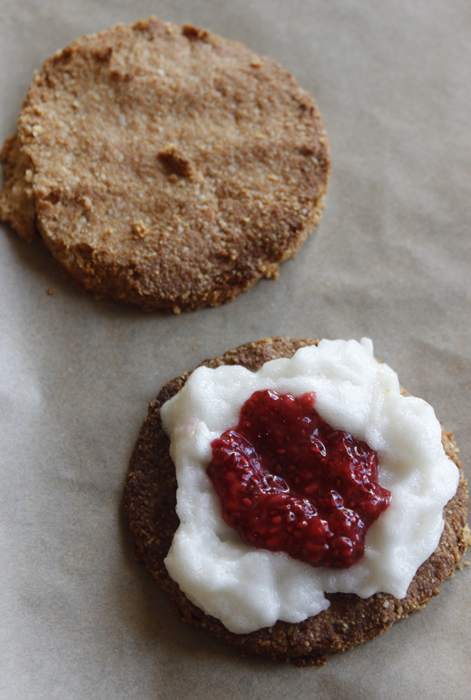
- Place in the oven for 10 minutes until golden brown on top, Do not touch Let them cool fully before using a spatula to gently lift them from the tray.
- For the raspberry, heat the raspberries over medium heat and gentle mash using a fork until they have dissolved, this should only take 1-2 minutes.
- Stir in the sweeter of choice , remove from heat and stir in the chia seeds. Let sit to one side for at least an hour or overnight in the fridge to thicken up.
- For the marshmallow, strain the chickpea liquid into a mixer, using the balloon whisk , mix as you would if making stiff egg whites. Whip for 3-4 minutes until the brine is fluffy and forming soft peaks- don’t taste I can’t guarantee it will be nice.
- Add in the powdered stevia and vanilla essence and whisk for a further minute, now you can try a little!
- In a small saucepan add the water and agar and let sit for 3 minutes on low heat, give a little stir and now bring to a gentle boil until the agar has fully dissolved.Remove form the heat and stir really well in to the fluff.
- Pour into a lined square tin. Place in the fridge overnight until it has set a little it should still be spongey.
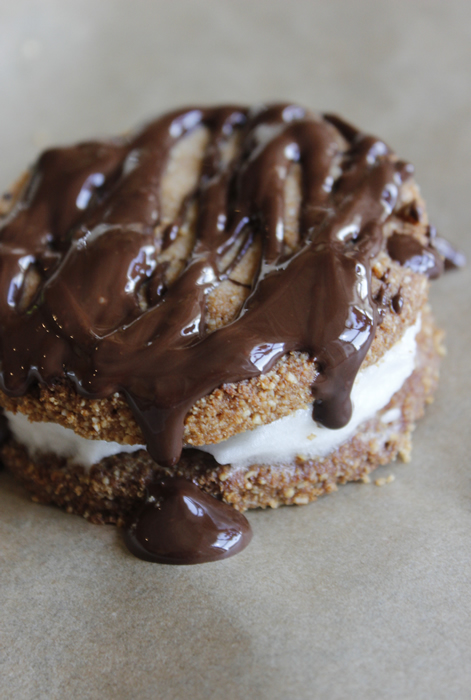
- To make the chocolate, melt the cocoa butter, maple and cocoa powder in a small saucepan over a low heat, making sure it doesn’t boil. Stirring until smooth and fully combined with no separation.
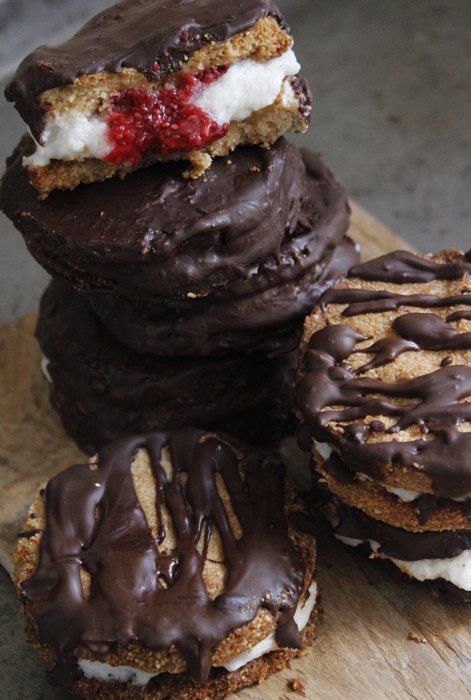
- Now to assemble ! Start by dipping one side of the biscuits in the chocolate or drizzling on top for a fancy wheel and placing them in the fridge to set.
- Once these are done top off a biscuit with some marshmallow and a small well of jam in the middle, now to sandwich it with another biscuit and DIG IN! Oh Don’t forget to take a pic and tag me!